After optimizing lately my vllm startup I started optimizing performance of vLLM during inference. Thing it had abysmal performance spanning like 2-4ts. Or even 0.5ts with 180k context. That was really terrible and I started to think that I wont be able to get better performance out of Strix Halo inside my Desktop Framework.
But… I remembered people praising it and its great usability with agents and Qwen models. How is that possible since it have so terrible performance.
I tested new version of Qwen 3.6 MOE in GGUF format with MTP (it was not available till recently in llama.cpp). On Vulkan I was able to achieve even 60t/s! Wow!
How is that possible? I understand that llama.cpp is optimized for single user usage but still… 60t/s vs 4? That is gigantic difference.
And then I tried it on agent and it was often almost all the time with more complex tool usage like regex replace for example.
I did another web search and some people were praising dense model as more correct. I decided to give it a go and it works!
It is much slower achieving only 20-30t/s in llama.cpp, but it is better to have slower but very often outputting correct text model instead of the wrong one like with MOE.
Just to have comparison I tested both llama.cpp with Qwen 3.6 27B:
============ Serving Benchmark Result ============
Successful requests:                     100
Failed requests:                         0
Maximum request concurrency:             1
Benchmark duration (s):                  3473.48
Total input tokens:                      2915
Total generated tokens:                  25600
Request throughput (req/s):              0.03
Output token throughput (tok/s):         7.37
Peak output token throughput (tok/s):    4.00
Peak concurrent requests:                2.00
Total token throughput (tok/s):          8.21
---------------Time to First Token----------------
Mean TTFT (ms):                          703.98
Median TTFT (ms):                        718.68
P99 TTFT (ms):                           737.81
-----Time per Output Token (excl. 1st token)------
Mean TPOT (ms):                          133.42
Median TPOT (ms):                        124.01
P99 TPOT (ms):                           158.99
---------------Inter-token Latency----------------
Mean ITL (ms):                           367.61
Median ITL (ms):                         355.41
P99 ITL (ms):                            1000.07
==================================================
Less than 10t/s. And this is for small prompts about 20-30t. For over 100k context it would be most probably 4t/s.
But then I tested llama.cpp.
============ Serving Benchmark Result ============
Successful requests:                     100
Failed requests:                         0
Maximum request concurrency:             1
Benchmark duration (s):                  1029.14
Total input tokens:                      2915
Total generated tokens:                  25600
Request throughput (req/s):              0.10
Output token throughput (tok/s):         24.88
Peak output token throughput (tok/s):    52.00
Peak concurrent requests:                2.00
Total token throughput (tok/s):          27.71
---------------Time to First Token----------------
Mean TTFT (ms):                          315.49
Median TTFT (ms):                        194.85
P99 TTFT (ms):                           1046.75
-----Time per Output Token (excl. 1st token)------
Mean TPOT (ms):                          39.10
Median TPOT (ms):                        29.51
P99 TPOT (ms):                           120.42
---------------Inter-token Latency----------------
Mean ITL (ms):                           38.82
Median ITL (ms):                         0.02
P99 ITL (ms):                            362.10
==================================================
27 t/s. This is huge difference. And llama.cpp can have similar throughput of tokens even with 200k context. Yes only for one user but on the other hand I can run two models like that and have agent use one and my AI assistant use another one.
Still this is very peculiar situation, why there is such difference. I will test it more but even if I messed up some of kernel parameters for GTT, which I do not think I did, with docker image that I am using it should rather OOM instead of getting so slow. Also with docker image all necessary libraries should be bundled there.
I will keep testing it but right now I am again using llama mostly for inference.
AI hype is calming down in some companies, but in others like in the one I am currently consulting for, we still on the hype.
Few days ago I was asked by my peer about some problem with the tool that I was mostly developing. This is fine are there are always some bugs in every software, though bug was concerning behavior on bad data and therefore out of scope really. Still I offered to help, regardless of the fact that correct fix would be to fix the bad data.
The correct fix, and its operation would be more or less, without going into the details:
remove few thousands files
remove another few hundred files
run two scripts about 15 times.
rename few files that is output of scripts
check if everything is working
run tests
So the only complication is quantity of changed files. Since this operation touches few thousands of files, the scope of such change would be big and hard to review. This is why running the tests after is so much of importance.
But the whole process is not complicated – there is just a lot of boring, testing and validation to be done after such operation.
I did it twice already as it is not complex, it is just boring and time consuming, but I did it on much smaller scale: about 10 and 20 files.
The difference is just scale.
My colleague responded with:
I could ask Claude to do that!
Immediately fallowed if such tool could consume few hundred files and rework their contents. I was surprised. I understand that this is connected to the tool I wrote and therefore I am more familiar with the process… but still it felt strange!
Why would you ask the tool to do it for you? Literally there are tools for that:
delete key on your keyboard
scripts we wrote and are available on every project we are working on
tests
Why you need Claude to that for you? It does not makes sense.
Few days later we were discussing some issue connected to our release procedure. As every procedure ever it is not 100% full proof. Nothing ever is. People are just fine with procedures that works 90% of the time and rest is handled ad hoc. When you have problems with releasing your code to production though procedure should either include recommendation if you should rollback or fix the problem as soon as it is possible.
Another engineer proposed:
I can imagine, asking Claude that if we should rollback or not.
I am not really an expert of how fast is Claude with going through multiple projects and expecting an answer if you should either roll back or try to fix the deployment – but it does not seem to be sensible.
Like imagine! Your are a plumber and instead of immediately rushing to fixing broken pipe, because water will destroy customer house, you just standing in front of it, typing on the phone instead:
Chat GPT, if I have broken water pipe and it is leaking water how to fix it? Should I try to close water intake? Or should I try to fix the pipe instead by cutting part of it and replacing with new one?
This does not makes sense.
You are the specialist here! Sure, learn, use so-called-AI, see if this will be able to give you correct answer. Maybe it have an access to new technics that you do not know… But not when there is an emergency!
We still climbing the AI hype, but I have funny feeling about this whole thing not being so good for industry, now.
Either you are an engineer or your are agent manager.
I have been running few coding agents in my spare time on my personal projects and Junie does not look great when paired with local model
First of all, local models are capable but their ability to answer prompts in sustainable speeds degrades very quickly. I was experimenting with Qwen3.6-35B-A3B and Qwen3.5-35B-A3B. Both seems to be fairly capable, which is great for a local model that can run on decent GPU that is few years old (I have Radeon 7900 XTX with 24GB of VRAM) – that is outstanding considering what we thought about computers i.e. ten years ago. If someone then would say to me that we will be able to converse with our applications in human language and instruct them to do useful stuff, I would say: ‘Impossible!’. But we can and it does work but it have limitation, mainly in context size.
It works fine till you pass threshold of about 20k tokens. After that it slows down and after 50k tokens it will be timing out constantly. After 100k I will be running single prompt for hours.
I started new project, that I called SharpPad. Intention is that it will be interactive CLI for running C# code. I am using sometimes Python for some quick operations like splitting more complex string into usable data and outputting it into Json. I thought that it would be nice to have something similar for C#. As far as I know it does not exists or I was unable to find it. Anyway I can write my own tool now with assistance of coding agents. I decided to try that.
For now, I tried Junie and Mistral Vibe (pretty terrible name IMHO). Junie advantages are that it have great integration with Rider IDE that I have been using for several years now (about 8 I think).
On the bad side it seems terribly unresponsive and slow.
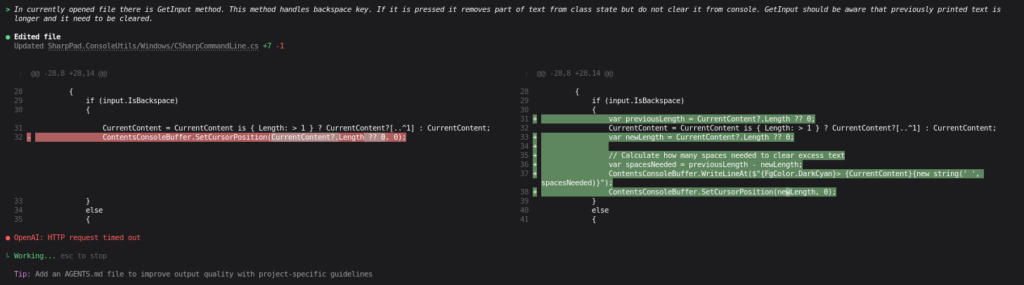
For example I had a bug that
In currently opened file there is GetInput method. This method handles backspace key. If it is pressed it removes part of text from class state but do not clear it from console. GetInput should be aware that previously printed text is longer and it need to be cleared.
It was working for about an 20, maybe 30 mins. It time outed once during this simple task.
That is pretty simple thing to do, and it fails to do it with local model.
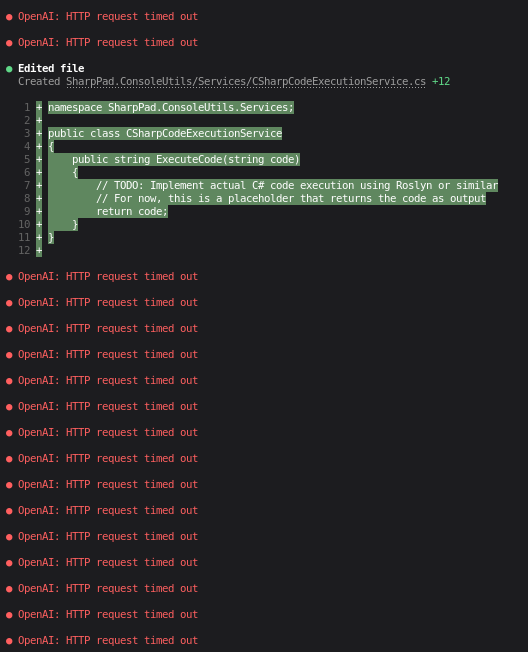
Or I asked Junie to do simple change in code. It added one file and started failing:
Good thing it does have ability to automatically retry by itself without me forcing it to retry.
But still for such a simple task it is so slow that it is basically useless.
I have been running this particular coding agent for few weeks now, experimenting with different tasks here and there but result is fairly consistent: It times out very often. What helps with that is auto compaction threshold.
Sadly Junie does not have that setting. Seems like I will have to experiment a bit more with Mistral Vibe, or PI or OpenCode, that does have such settings.
vLLM has very slow time to first token (TTFT). On AMD Ryzen AI Max+ 395 it can take even 10 minutes depending on exact settings and model size.
To make my user experience of using those things myself I need to have comparison of llama.cpp and vLLM startup time and performance. But to do this I needed to perform optimizations of startup of vLLM since it is even slower to start then it was with v0.17.
Performance and Startup Time optimizations
Going trough vLLM documentations, tutorials and other articles I was able to came up with possible ways of optimizing startup and token generation for my specific usage.
For example those settings may have impact on startup time:
pre download model (of course!)
vllm cache sharing
size of context
data type size
enforce eager switch
enable prefix catching switch
optimization level
safetensor loading strategy
disabling multi modal profiling
language generation only
On the other hand those setting may or not have impact on token generation speed:
perfomance mode
optimization level
enable prefix catching switch
Some overlap but it make sense since if you optimize things during startup it make it slower but you do not have to do it during runtime which slows things down during actual usage.
Testing methodology
I created following test script for running my model:
Basing on what switch/argument I am testing, new lines are added. For example if I want to test impact of speculative decoding configuration I am adding following line to above script:
Sometimes 11.5% of GPU memory allocation was too little start vLLM engine with some specific settings (i.e. speculative decoding needs a bit more) so it was increased slightly to 13% or 15%.
To test how long it takes for vLLM to startup I am using following script written in Python:
#!/usr/bin/env python3
"""
Script to start vLLM via bash script and measure startup time until /health endpoint responds.
"""

import subprocess
import requests
import time
import sys
import os
from typing import Optional
import sys
import os

CONTAINER_NAME = 'vllm-startup-test'


def get_spinner_frames():
    """Return spinner animation frames."""
    return ['⣾', '⣽', '⣻', '⢿', '⡿', '⣟', '⣯', '⣷']


def start_vllm_server(bash_script_path: str, **kwargs) -> subprocess.Popen:
    """
    Start vLLM server using external bash script.
    """
    if not os.path.exists(bash_script_path):
        raise FileNotFoundError(f"Bash script not found: {bash_script_path}")

    cmd = ['/bin/bash', bash_script_path, CONTAINER_NAME]

    for key, value in kwargs.items():
        cmd.extend([f"--{key}", str(value)])

    process = subprocess.Popen(
        cmd,
        stdout=subprocess.PIPE,
        stderr=subprocess.STDOUT,
        text=True,
        bufsize=1
    )

    return process


def wait_for_health_endpoint(
        base_url: str,
        process: subprocess.Popen,
        endpoint: str = "/health",
        polling_interval: float = 1.0
) -> Optional[float]:
    """
    Wait for the vLLM /health endpoint to respond with spinner animation.
    """
    full_url = f"{base_url}{endpoint}"
    start_time = time.time()

    spinner_frames = get_spinner_frames()
    frame_index = 0
    current_line_length = 0
    timeout = 60 * 20

    try:
        while time.time() - start_time < timeout:
            # Check if process has exited with an error
            process_returncode = process.poll()
            if process_returncode is not None:
                print(f"\r{' ' * (current_line_length + 50)}", end='', flush=True)
                if process_returncode != 0:
                    print(f"\r✗ vLLM server process exited with error code: {process_returncode}", flush=True)
                    process.wait()
                    returncode = process.wait()
                    print(f"  Return code: {returncode}", flush=True)
                    raise RuntimeError(f"vLLM server process failed with exit code {process_returncode}")
                else:
                    print(f"\r✓ vLLM server process exited normally", flush=True)
                    raise RuntimeError("vLLM server process exited before health check")

            # Print spinner animation (overwrite same line)
            spinner_frame = spinner_frames[frame_index]
            status_msg = f"\r⏳ Waiting for {full_url}... "
            print(f"{spinner_frame}{status_msg}", end='', flush=True)

            # Clear any previous status text on this line
            current_line_length = len(f"{spinner_frame}{status_msg}")

            try:
                response = requests.get(full_url, timeout=5)
                if response.status_code == 200:
                    # Clear the spinner line
                    print(f"\r{' ' * (current_line_length + 50)}", end='', flush=True)
                    elapsed = time.time() - start_time
                    return elapsed
                else:
                    print(f"\r{' ' * (current_line_length + 50)}", end='', flush=True)
                    print(f"\r✗ Health check failed with status code: {response.status_code}", flush=True)
                    print(f"  Response: {response.text[:200]}", flush=True)
            except requests.exceptions.ConnectionError:
                pass  # Spinner continues
            except requests.exceptions.Timeout:
                pass  # Spinner continues
            except requests.exceptions.RequestException as e:
                print(f"\r{' ' * (current_line_length + 50)}", end='', flush=True)
                print(f"\r⚠ Health check error: {e}", flush=True)

            frame_index = (frame_index + 1) % len(spinner_frames)
            time.sleep(polling_interval)

        # Timeout
        print(f"\r{' ' * (current_line_length + 50)}", end='', flush=True)
        elapsed = time.time() - start_time
        print(f"\r✗ Timeout waiting for health endpoint after {elapsed:.2f} seconds", flush=True)
        return None

    except KeyboardInterrupt:
        print("\nReceived interrupt signal, terminating server...", flush=True)
        raise
    finally:
        # Clear spinner line on exit
        print(f"\r{' ' * (current_line_length + 50)}", end='', flush=True)


def measure_vllm_startup(
        bash_script_path: str,
        **kwargs
) -> float:
    """
    Measure vLLM startup time from script start to health endpoint response.
    """
    base_url = f"http://localhost:{8000}"

    start_time = time.time()

    process = start_vllm_server(bash_script_path, **kwargs)

    try:
        startup_time = wait_for_health_endpoint(base_url, process)

        total_time = time.time() - start_time

        if startup_time is not None:
            print(f"\rTotal elapsed time: {total_time:.2f} seconds")
        else:
            print(f"\n{'='*60}")
            print(f"vLLM startup timed out!")
            print(f"  Total elapsed time: {total_time:.2f} seconds")
            print(f"{'='*60}\n")
            raise TimeoutError("vLLM startup timeout")

        return startup_time

    except KeyboardInterrupt:
        print("\nReceived interrupt signal, terminating server...")
        process.terminate()
        raise
    finally:
        if process.poll() is None:
            process.terminate()
            process.wait()

            # stop docker container
            process = subprocess.Popen(
                ['docker', 'stop', CONTAINER_NAME],
                stdout=subprocess.PIPE,
                stderr=subprocess.STDOUT,
                text=True,
                bufsize=1
            )

            process.wait()


if __name__ == "__main__":
    import argparse

    parser = argparse.ArgumentParser(
        description="Measure vLLM startup time via health endpoint"
    )
    parser.add_argument(
        "bash_script",
        help="Path to the bash script that starts vLLM"
    )
    parser.add_argument(
        "--args",
        nargs="*",
        help="Additional arguments to pass to vLLM server"
    )

    args = parser.parse_args()

    kwargs = {}
    if args.args:
        for arg in args.args:
            if "=" in arg:
                key, value = arg.split("=", 1)
                kwargs[key] = value
            else:
                kwargs[arg] = True

    try:
        startup_time = measure_vllm_startup(
            bash_script_path=args.bash_script,
            **kwargs
        )
        sys.exit(0)
    except Exception as e:
        print(f"Error: {e}")
        sys.exit(1)
It is pretty self explanatory but here is quick summary:
it runs previous bash script
it make a note of time before bash script was executed
wait for bash script to finish with an error
or wait for vLLM to start responding on /health endpoint
when it responds calculate startup time
Time of startup for bash script without any specific settings or caches will be our baseline for other scripts for comparison.
vLLM of version 0.19.2rc1.dev205+g07351e088 was used for testing.
Results
Below description of each tested setting and its impact on vLLM startup time.
Default settings
No specific settings beside bare minimum for vLLM to run Qwen3.5-2B-AWQ-4bit.
xychart-beta
    title "Default settings"
    x-axis [1,2,3,4,5]
    y-axis "Startup time [s]" 510 --> 550
    bar [542.76,522.71,517.69,517.69,514.69]
    line [542.76,522.71,517.69,517.69,514.69]
In average it is: 523,108s
Default settings with --dtype
Added settings to previous script
--dtype half
This should cut memory usage in half and since vLLM preallocates memory during startup, copying entire model with conversion, it should make startup faster.
No.
Time
1
376.52
2
375.54
3
377.58
4
379.56
5
364.59
xychart-beta
    title "Data type: half"
    x-axis [1,2,3,4,5]
    y-axis "Startup time [s]" 350 --> 390
    bar [376.52,375.54,377.58,379.56,364.59]
    line [376.52,375.54,377.58,379.56,364.59]
In average it is: 374,76s
---
config:
    xyChart:
        showDataLabel: true
        showDataLabelOutsideBar: true
---

xychart-beta
    title "Data type half startup gain"
    x-axis config [default,dtype=half]
    y-axis "Startup time [s]" 0 --> 600
    bar [523,375]
Gain is about 28%.
Pre-downloaded model
Downloading a model every time is not good solution even if you have HF_TOKEN (or similar way of authorization to different models source). It will take a lot of time for bigger models, a lot more than loading it from disk. Altered script adds mounting hugging face cache volume onto vLLM container.
Further tests will be done all with pre-downloaded model and they will be compared to average startup of vLLM with settings as with this script.
This script mounts huggingface cache directory into the container.
v ~/.cache/huggingface:/root/.cache/huggingface
No.
Time [s]
1
488.67
2
487.66
3
488.68
4
484.67
5
485.68
6
488.66
7
488.69
8
485.66
9
486.68
10
488.66
11
490.69
12
487.70
13
490.69
14
489.67
15
490.66
16
490.67
17
486.67
18
485.65
19
487.68
20
491.73
xychart-beta
    title "Pre-downloaded model"
    x-axis [1,2,3,4,5,6,7,8,9,10,11,12,13,14,15,16,17,18,19,20]
    y-axis "Startup time [s]" 480 --> 495
    bar [488.67,487.66,488.68,484.67,485.68,488.66,488.69,485.66,486.68,488.66,490.69,487.70,490.69,489.67,490.66,490.67,486.67,485.65,487.68,491.73]
    line [488.67,487.66,488.68,484.67,485.68,488.66,488.69,485.66,486.68,488.66,490.69,487.70,490.69,489.67,490.66,490.67,486.67,485.65,487.68,491.73]
In average it is 488,28s
---
config:
    xyChart:
        showDataLabel: true
        showDataLabelOutsideBar: true
---

xychart-beta
    title "Pre-downloaded model startup gain"
    x-axis config [default,dtype=half]
    y-axis "Startup time [s]" 0 --> 600
    bar [523,488]
Gain is about 7%.
Data type half
Altered script adds --dtype half to the script with pre-downloaded model. Any script from now on will be treating pre-downloaded model script as base for comparisons. I do not want to call Huggingface API every time I am doing test.
No.
Time
1
333.48
2
329.50
3
335.51
4
328.48
5
331.49
6
330.50
7
332.52
8
335.48
9
330.51
10
341.51
11
336.51
12
334.51
13
332.49
14
330.51
15
329.49
16
333.51
17
332.52
18
342.52
19
332.50
20
338.50
xychart-beta
    title "Data type 'half'"
    x-axis [1,2,3,4,5,6,7,8,9,10,11,12,13,14,15,16,17,18,19,20]
    y-axis "Startup time [s]" 320 --> 350
    bar [333.48,329.50,335.51,328.48,331.49,330.50,332.52,335.48,330.51,341.51,336.51,334.51,332.49,330.51,329.49,333.51,332.52,342.52,332.50,338.50]
    line d [333.48,329.50,335.51,328.48,331.49,330.50,332.52,335.48,330.51,341.51,336.51,334.51,332.49,330.51,329.49,333.51,332.52,342.52,332.50,338.50]
In average it is: 333.60s
---
config:
    xyChart:
        showDataLabel: true
        showDataLabelOutsideBar: true
---

xychart-beta
    title "Startup gain"
    x-axis config [default,pre-download]
    y-axis "Startup time [s]" 0 --> 500
    bar [488,334]
Gain is about 32%.
vLLM cache
vLLM caches few things to the disk during startup so if you running it via docker container it get lost because it is destroyed every time container is created. To remedy this, this directory need to be mounted between reruns.
-v /root/.cache/vllm:/root/.cache/vllm
No.
Time [s]
1
368.49
2
364.49
3
376.51
4
356.48
5
355.47
6
362.46
7
362.47
8
366.48
9
353.46
10
366.46
11
365.45
12
365.45
13
364.45
14
364.45
15
363.46
16
361.45
17
363.46
18
358.44
19
364.44
20
360.44
xychart-beta
    title "vLLM cache"
    x-axis [1,2,3,4,5,6,7,8,9,10,11,12,13,14,15,16,17,18,19,20]
    y-axis "Startup time [s]" 350 --> 380
    bar [368.49,364.49,376.51,356.48,355.47,362.46,362.47,366.48,353.46,366.46,365.45,365.45,364.45,364.45,363.46,361.45,363.46,358.44,364.44,360.44]
    line d [368.49,364.49,376.51,356.48,355.47,362.46,362.47,366.48,353.46,366.46,365.45,365.45,364.45,364.45,363.46,361.45,363.46,358.44,364.44,360.44]
Average startup time with vllm cache is: 392.92s
---
config:
    xyChart:
        showDataLabel: true
        showDataLabelOutsideBar: true
---

xychart-beta
    title "Startup gain"
    x-axis config [default,pre-download]
    y-axis "Startup time [s]" 0 --> 500
    bar [488,393]
Gain is about 19%.
Small context
vLLM assign GPU memory ahead of time for context and kv space during startup. Requesting smaller context for your model in theory should speed things up, a bit at least.
This script adds max-model-len setting to pre-downloaded model:
--max-model-len 2k
No.
Time [s]
1
488.69
2
482.68
3
489.68
4
488.68
5
478.68
6
486.67
7
478.68
8
487.69
9
486.72
10
490.67
11
477.68
12
489.69
13
487.69
14
487.68
15
488.70
16
489.69
17
488.75
18
481.69
19
491.68
20
480.66
xychart-beta
    title "Small context startup time"
    x-axis [1,2,3,4,5,6,7,8,9,10,11,12,13,14,15,16,17,18,19,20]
    y-axis "Startup time [s]" 475 --> 495
    bar [488.69,482.68,489.68,488.68,478.68,486.67,478.68,487.69,486.72,490.67,477.68,489.69,487.69,487.68,488.70,489.69,488.75,481.69,491.68,480.66]
    line d [488.69,482.68,489.68,488.68,478.68,486.67,478.68,487.69,486.72,490.67,477.68,489.69,487.69,487.68,488.70,489.69,488.75,481.69,491.68,480.66]
Average startup time with vllm cache is: 486,14s
---
config:
    xyChart:
        showDataLabel: true
        showDataLabelOutsideBar: true
---

xychart-beta
    title "Startup gain"
    x-axis config [default,pre-download]
    y-axis "Startup time [s]" 0 --> 500
    bar [488,486]
Gain is less than 0.5%.
With model tools
If you plan to use your models as part of your agent or to run your assistant, tools are necessary. Just out of curiosity I wanted to test if those settings have any noticeable impact on the vLLM startup time.
Following settings were added to pre-downloaded model script:
xychart-beta
    title "Tools startup time"
    x-axis [1,2,3,4,5,6,7,8,9,10,11,12,13,14,15,16,17,18,19,20]
    y-axis "Startup time [s]" 475 --> 510
    bar [486.65,491.69,491.67,486.67,485.65,489.68,486.66,487.67,495.73,495.69,478.67,481.67,490.71,494.73,490.73,482.72,487.70,497.67,487.64,494.67]
    line d [486.65,491.69,491.67,486.67,485.65,489.68,486.66,487.67,495.73,495.69,478.67,481.67,490.71,494.73,490.73,482.72,487.70,497.67,487.64,494.67]
Average startup time with tool is: 489,23s
---
config:
    xyChart:
        showDataLabel: true
        showDataLabelOutsideBar: true
---

xychart-beta
    title "Startup gain"
    x-axis config [default,pre-download]
    y-axis "Startup time [s]" 0 --> 500
    bar [488,489]
Using tools have negative impact on performance of less than 0.2%. Basically rounding error.
Quantized kv cache
One of the problems during running inference is kv cache sizes. One way of remedy this is to quantize this data so it will take less space. Should not have impact on the startup time directly, but if kv cache is smaller engine will have to allocate less space and it will start sooner.
This script adds following setting on top of pre-downloaded model script:
--kv-cache-dtype fp8_e4m3
No.
Time [s]
1
496.71
2
490.72
3
492.73
4
493.70
5
482.72
6
476.71
7
488.72
8
492.74
9
487.73
10
491.75
11
490.70
12
491.71
13
481.71
14
491.73
15
497.69
16
495.70
17
487.68
18
490.68
19
492.70
20
490.70
xychart-beta
    title "Quantized KV cache startup time"
    x-axis [1,2,3,4,5,6,7,8,9,10,11,12,13,14,15,16,17,18,19,20]
    y-axis "Startup time [s]" 475 --> 500
    bar [496.71,490.72,492.73,493.70,482.72,476.71,488.72,492.74,487.73,491.75,490.70,491.71,481.71,491.73,497.69,495.70,487.68,490.68,492.70,490.70]
    line d [496.71,490.72,492.73,493.70,482.72,476.71,488.72,492.74,487.73,491.75,490.70,491.71,481.71,491.73,497.69,495.70,487.68,490.68,492.70,490.70]
Average startup time with quantized kv cache is: 490.26s
---
config:
    xyChart:
        showDataLabel: true
        showDataLabelOutsideBar: true
---

xychart-beta
    title "Startup gain"
    x-axis config [default,pre-download]
    y-axis "Startup time [s]" 0 --> 500
    bar [488,490]
Gain is -0.4%.
Pre-download disable optimization
vLLM have 3 optimization levels that can be used to either optimize startup or inference speed. For the case of optimizing startup we can set it to 0, which should be the quickest to get engine ready to responde to queries. This scripts adds following line to pre-download model script:
--optimization-level 0
No.
Time [s]
1
434.60
2
433.59
3
433.59
4
434.58
5
433.58
6
436.59
7
433.59
8
434.58
9
435.59
10
434.60
11
431.58
12
433.57
13
423.58
14
417.57
15
423.59
16
423.58
17
424.60
18
419.58
19
432.60
20
431.58
xychart-beta
    title "Optimization 0 startup time"
    x-axis [1,2,3,4,5,6,7,8,9,10,11,12,13,14,15,16,17,18,19,20]
    y-axis "Startup time [s]" 415 --> 440
    bar [434.60,433.59,433.59,434.58,433.58,436.59,433.59,434.58,435.59,434.60,431.58,433.57,423.58,417.57,423.59,423.58,424.60,419.58,432.60,431.58]
    line d [434.60,433.59,433.59,434.58,433.58,436.59,433.59,434.58,435.59,434.60,431.58,433.57,423.58,417.57,423.59,423.58,424.60,419.58,432.60,431.58]
Average startup time with disable optimization is: 430.33s
---
config:
    xyChart:
        showDataLabel: true
        showDataLabelOutsideBar: true
---

xychart-beta
    title "Startup gain"
    x-axis config [default,pre-download]
    y-axis "Startup time [s]" 0 --> 500
    bar [488,430]
Gain is around 12%.
Enable prefix cache
--enable-prefix-caching
No.
Time [s]
1
479.66
2
474.67
3
478.67
4
487.68
5
487.68
6
477.67
7
487.72
8
488.69
9
488.67
10
487.69
11
485.68
12
488.69
13
479.69
14
487.68
15
485.66
16
487.66
17
477.68
18
490.69
19
476.67
20
487.67
xychart-beta
    title "Prefix cache startup time"
    x-axis [1,2,3,4,5,6,7,8,9,10,11,12,13,14,15,16,17,18,19,20]
    y-axis "Startup time [s]" 470 --> 495
    bar [479.66,474.67,478.67,487.68,487.68,477.67,487.72,488.69,488.67,487.69,485.68,488.69,479.69,487.68,485.66 ,487.66 ,477.68,490.69,476.67,487.67]
    line d [479.66,474.67,478.67,487.68,487.68,477.67,487.72,488.69,488.67,487.69,485.68,488.69,479.69,487.68,485.66 ,487.66 ,477.68,490.69,476.67,487.67]
Average startup time with disable optimization is: 484.33s
---
config:
    xyChart:
        showDataLabel: true
        showDataLabelOutsideBar: true
---

xychart-beta
    title "Startup gain"
    x-axis config [default,pre-download]
    y-axis "Startup time [s]" 0 --> 500
    bar [488,484]
Gain is around 0,8%.
Enforce eager
This settings decides if CUDA graphs should be disabled or not. If disabled graphs wont be calculated during startup which should speed up startup. This scripts add following line to pre-download model script:
--enforce-eager
No.
Time [s]
1
426.60
2
443.60
3
435.59
4
472.63
5
430.57
6
432.60
7
430.57
8
423.59
9
432.60
10
434.58
11
431.59
12
430.59
13
435.58
14
419.57
15
426.62
16
434.58
17
441.60
18
437.59
19
431.58
20
435.59
xychart-beta
    title "Enforce eager startup time"
    x-axis [1,2,3,4,5,6,7,8,9,10,11,12,13,14,15,16,17,18,19,20]
    y-axis "Startup time [s]" 420 --> 475
    bar [426.60,443.60,435.59,472.63,430.57,432.60,430.57,423.59,432.60,434.58,431.59,430.59,435.58,419.57,426.62,434.58,441.60,437.59,431.58,435.59]
    line d [426.60,443.60,435.59,472.63,430.57,432.60,430.57,423.59,432.60,434.58,431.59,430.59,435.58,419.57,426.62,434.58,441.60,437.59,431.58,435.59]
Average startup time with disable optimization is: 434.39s
---
config:
    xyChart:
        showDataLabel: true
        showDataLabelOutsideBar: true
---

xychart-beta
    title "Startup gain"
    x-axis config [default,pre-download]
    y-axis "Startup time [s]" 0 --> 500
    bar [488,434]
Gain is around 11%.
Lazy safetensors loading
This setting enforces lazy loading of safetensors. It may be helpful if you have model stored on quick disk storage instead of in example network storage with high latency. This script adds following line to pre-downloaded model script:
--safetensors-load-strategy=lazy
No.
Time [s]
1
489.68
2
493.70
3
496.70
4
488.69
5
489.69
6
488.68
7
482.69
8
489.70
9
484.69
10
486.69
11
489.69
12
487.68
13
482.69
14
489.69
15
487.67
16
485.68
17
487.67
18
486.69
19
487.70
20
489.67
xychart-beta
    title "Lazy safetensors load startup time"
    x-axis [1,2,3,4,5,6,7,8,9,10,11,12,13,14,15,16,17,18,19,20]
    y-axis "Startup time [s]" 480 --> 500
    bar [489.68,493.70,496.70,488.69,489.69,488.68,482.69,489.70,484.69,486.69,489.69,487.68,482.69,489.69,487.67,485.68,487.67,486.69,487.70,489.67]
    line d [489.68,493.70,496.70,488.69,489.69,488.68,482.69,489.70,484.69,486.69,489.69,487.68,482.69,489.69,487.67,485.68,487.67,486.69,487.70,489.67]
Average startup time with disable optimization is: 488,29s
---
config:
    xyChart:
        showDataLabel: true
        showDataLabelOutsideBar: true
---

xychart-beta
    title "Startup gain"
    x-axis config [default,pre-download]
    y-axis "Startup time [s]" 0 --> 500
    bar [488,488]
Gain is None.
Interactivity
vLLM can be optimized against handling more parallel requests or for single user usage interactivity with single request. This script tests for such setting impact on startup time adding following line to pre download model script:
--performance-mode interactivity
No.
Time [s]
1
481.70
2
479.70
3
480.68
4
491.68
5
491.69
6
482.69
7
489.69
8
490.73
9
484.71
10
483.69
11
491.70
12
492.70
13
492.69
14
481.69
15
481.68
16
488.69
17
493.71
18
481.67
19
494.70
20
495.70
xychart-beta
    title "Interactivity startup time"
    x-axis [1,2,3,4,5,6,7,8,9,10,11,12,13,14,15,16,17,18,19,20]
    y-axis "Startup time [s]" 475 --> 500
    bar [481.70,479.70,480.68,491.68,491.69,482.69,489.69,490.73,484.71,483.69,491.70,492.70,492.69,481.69,481.68,488.69,493.71,481.67,494.70,495.70]
    line d [481.70,479.70,480.68,491.68,491.69,482.69,489.69,490.73,484.71,483.69,491.70,492.70,492.69,481.69,481.68,488.69,493.71,481.67,494.70,495.70]
Average startup time with disable optimization is: 487,59s
---
config:
    xyChart:
        showDataLabel: true
        showDataLabelOutsideBar: true
---

xychart-beta
    title "Startup gain"
    x-axis config [default,pre-download]
    y-axis "Startup time [s]" 0 --> 500
    bar [488,488]
Gain is None basically. Which is good because it means we can optimize for single user usage without compromising startup time.
Speculative decoding MTP
Qwen models have buil-in MPT speculative decoding method. This should speed up inference but impact on startup time should be negative. This script adds following configuration to existing pre-download model script:
xychart-beta
    title "Speculative decoding startup time"
    x-axis [1,2,3,4,5,6,7,8,9,10,11,12,13,14,15,16,17,18,19,20]
    y-axis "Startup time [s]" 510 --> 540
    bar [522.76,518.74,510.73,518.75,521.75,517.73,531.74,526.74,511.72,526.76,519.70,521.75,521.76,524.74,530.75,516.73,521.74,515.75,536.75,522.74]
    line d [522.76,518.74,510.73,518.75,521.75,517.73,531.74,526.74,511.72,526.76,519.70,521.75,521.76,524.74,530.75,516.73,521.74,515.75,536.75,522.74]
Average startup time with disable optimization is: 521,99s
---
config:
    xyChart:
        showDataLabel: true
        showDataLabelOutsideBar: true
---

xychart-beta
    title "Startup gain"
    x-axis config [default,pre-download]
    y-axis "Startup time [s]" 0 --> 525
    bar [488,522]
Gain is negative by 7%.
Skip multi modal profiling
Qwen 3.5 has vision capabilities and for most part, I do not use them, for now. vLLM engine have --skip-mm-profiling argument that disables memory profiling for non text modalities. Instead engine will try to use multi modal model capabilities with memory it was given by the user, so if you will assign the insufficient amount it may crash. This script adds following line to pre-downloaded model script:
--skip-mm-profiling
No.
Time [s]
1
220.42
2
220.43
3
221.40
4
219.41
5
218.44
6
217.42
7
217.42
8
216.44
9
217.42
10
217.46
11
217.43
12
218.42
13
216.44
14
216.44
15
217.44
16
217.44
17
216.44
18
217.44
19
217.43
20
218.45
xychart-beta
    title "Disable mm profiling startup time"
    x-axis [1,2,3,4,5,6,7,8,9,10,11,12,13,14,15,16,17,18,19,20]
    y-axis "Startup time [s]" 210 --> 225
    bar [220.42,220.43,221.40,219.41,218.44,217.42,217.42,216.44,217.42,217.46,217.43,218.42,216.44,216.44,217.44,217.44,216.44,217.44,217.43,218.45]
    line d [220.42,220.43,221.40,219.41,218.44,217.42,217.42,216.44,217.42,217.46,217.43,218.42,216.44,216.44,217.44,217.44,216.44,217.44,217.43,218.45]
Average startup time with disabled multi modal profiling is: 217.98s
---
config:
    xyChart:
        showDataLabel: true
        showDataLabelOutsideBar: true
---

xychart-beta
    title "Startup gain"
    x-axis config [default,pre-download]
    y-axis "Startup time [s]" 0 --> 500
    bar [488,218]
Startup is cut by more than a half. Gain is 55%.
Language only
Some models have vision modality also. If you do not use it you may disable it entirelly for faster startup time. This script adds following line to pre-downloaded model script:
--language-model-only
No.
Time [s]
1
60.12
2
60.11
3
60.12
4
61.13
5
60.12
6
61.12
7
62.13
8
60.13
9
61.13
10
60.13
11
60.13
12
60.13
13
61.12
14
60.13
15
60.12
16
60.12
17
60.13
18
60.14
19
60.12
20
60.12
xychart-beta
    title "Text only startup time"
    x-axis [1,2,3,4,5,6,7,8,9,10,11,12,13,14,15,16,17,18,19,20]
    y-axis "Startup time [s]" 60 --> 63
    bar [60.12,60.11,60.12,61.13,60.12,61.12,62.13,60.13,61.13,60.13,60.13,60.13,61.12,60.13,60.12,60.12,60.13,60.14,60.12,60.12]
    line d [60.12,60.11,60.12,61.13,60.12,61.12,62.13,60.13,61.13,60.13,60.13,60.13,61.12,60.13,60.12,60.12,60.13,60.14,60.12,60.12]
Average startup time with disabled multi modal profiling is: 60.43s
---
config:
    xyChart:
        showDataLabel: true
        showDataLabelOutsideBar: true
---

xychart-beta
    title "Startup gain"
    x-axis config [default,pre-download]
    y-axis "Startup time [s]" 0 --> 500
    bar [488,60]
Startup is much, quicker. Gain is 88%!
Summary
Here is comparison table of all the settings that were tested and their impact on startup time and GPU memory requirements.
Settings
Time [s]
Gain [%]
VRAM [%]
VRAM [GB]
T/s
–
523.11
–
11.5
13.8
294.32
pre-download
488.28
7
11.5
13.8
296.86
dtype half
333.60
32
11.5
13.8
321.32
vllm cache
392,92
19
11.5
13.8
290.77
small context
486.14
0.5
11.5
13.8
295.68
tools
489.23
-0.2
11.5
13.8
291.07
kv-cache-dtype
490.26
-0.4
11.5
13.8
268.98
no optimization
430.33
12
11.5
13.8
335.89
prefix cache
484.33
0,8
11.5
13.8
293.79
enforce eager
434.39
11
11.5
13.8
335.12
lazy safetensor loading
488.29
0
11.5
13.8
288.38
interactivity
487.59
0
11.5
13.8
291.89
speculative decoding
521.99
-7
16.7
20.04
266.91
disble multi modal profiling
217,98
55
11.5
13.8
300,47
language only
218.82
88
0.095
11,4
296,94
From the table you can see it is not worth to use lazy safetensor loading strategy.
Speculative decoding almost does not seem to be worth it of slower start and slower T/s. It does cuts Time To First Token a bit (TTFT) from:
---------------Time to First Token----------------
Mean TTFT (ms):                          418.84
Median TTFT (ms):                        112.23
P99 TTFT (ms):                           2939.18
-----Time per Output Token (excl. 1st token)------
to:
---------------Time to First Token----------------
Mean TTFT (ms):                          395.08
Median TTFT (ms):                        186.63
P99 TTFT (ms):                           2305.16
-----Time per Output Token (excl. 1st token)------
But still does not seem to be worth it of all that trouble.
Tools slow things down but are necessary for agentic usage.
Quantization of kv cache does not seem to be worth it also.
What is worth to do it to set --dtype half as it cuts startup time considerably, and speeds up inference.
Disabling multi modal profiling maybe a bit risky if you will use other model modalities than only text, but makes startup quicker by almost 50%! I think it it well worth the risk.
If you do not want any modalities besid text generation you may disable them and cut startup time by more than a half.
Caching vllm files seems to be also quick and easy win.
The biggest surprise to me was --optimization 0 it seems like it speed up inference and cut startup time. By default --optimization have value of 2 so it is a bit counter intuitive that disabling it speed up things at runtime instead of slowing throughput down.
Setting up prefix caching and disabling python CUDa graphs seems to be also no brainer since it does not slow down inference, uses the same amount of memory and have positive impact on startup time.
In essence if you want to optimize for vLLM startup time you should use fallowing parameters:
docker run --rm --name="${1:-vllm-startup-test}" \
    --group-add=video \
    --cap-add=SYS_PTRACE \
    --security-opt seccomp=unconfined \
    --device /dev/kfd \
    --device /dev/dri \
    -v ~/.cache/vllm:/root/.cache/vllm \ #mount vLLM cache to not calculate the same files every time for 19% speed up
    -v ~/.cache/huggingface:/root/.cache/huggingface \ # mount model cache to avoid downloading the same model every time
    -e TORCH_ROCM_AOTRITON_ENABLE_EXPERIMENTAL=1 \
    -e VLLM_ROCM_USE_AITER=1 \
    -p "${2:-8000}":8000 \
    --ipc=host \
    vllm/vllm-openai-rocm:nightly \
    cyankiwi/Qwen3.5-2B-AWQ-4bit \
    --gpu-memory-utilization 0.115 \
    --dtype half \ #add this to cut startup time by 32%
    --optimization-level 0 \ # disable optimization to have 12% startup time gain
    --enforce-eager \ # disabling CUDa graphs will cut startup by 11%
    --enable-prefix-caching \ # this can be considered if there will be no other drawbacks since 0.8% is not much of a gain
    --language-model-only \ # add this if you do want only text generation (>50%)
    --skip-mm-profiling \ # or this if you want modality but will optimize memory usage manually (~50%)
Rest of parameters have great negative impacts during runtime or have no impact at all. Of course exact combination of parameters to achieve optimal startup time need to be tested on your specific environment and model you are using, but it is great start.
For example above script on my Dekstop Framework running Debian forky and vLLM v19 achieves about 110s startup time. Some experimentation with combination of above parameters I was able to reduce startup time to about 60s, so almost 1/9th of default.
Also with setting of kv-cache-dtype I was able cut memory usage by half to only 5.75℅ (all the test were done with 11.5℅ as staring point).
This is pretty big win.
Running above script gives fallowing results:
No.
Time [s]
1
60.13
2
58.13
3
60.13
4
60.13
5
59.12
6
60.13
7
59.12
8
59.12
9
59.12
10
60.13
11
59.12
12
58.12
13
59.12
14
59.11
15
58.11
16
58.13
17
58.12
18
58.12
19
58.13
20
60.12
Average startup time with with all the optimisations is: 59,07s.
---
config:
    xyChart:
        showDataLabel: true
        showDataLabelOutsideBar: true
---

xychart-beta
    title "Startup gain"
    x-axis config [default,pre-download]
    y-axis "Startup time [s]" 0 --> 525
    bar [523,59]
Speedup is 89%!
Final words
Have in mind that this might be specific to this particular model I tested. Different model may behave differently. Also it may varies between version of vLLM engine. I tested it on version 0.19.2rc1.dev205+g07351e088. Inference performance testing was done on v0.17 vllm bench serve.