

Introduction
This article is builds on topics and solutions introduces in ViewFactory for Xamarin application and Xamarin Master-Detail Page articles. It shows method for easier navigation and use of services via IoC in Xamarin application.
Knowledge from previous examples is not necessary, but makes this article bit easier to understand.
For IoC container it will use TinyIoC, but not vanilla version from author GitHub repository (or from Nuget). I will use my personal fork, because this version can be used in PCL projects, which allows TinyIoC to be placed inside shared project, which makes it much easier.
[Update]Version 1.3.0 od TinyIoC suppose to have PCL support, but it does not work. [/UPDATE]
Otherwise, with original version, which is incompatible with PCL version of .NET, we would be force to place the same TinyIoC code in every platform project. It does complicate things unnecessary. With PCL enabled version this is no longer a problem.
Idea is to use IoC container to:
- Create seamless navigation between views
- Resolve application services in view models
Easy navigation
It is important to note, that new navigation mechanism, should work for usual Xamarin views that are descendants from Xamarin Page class and also for pages deriving from DetailPage class. Detail views are the ones that have to be placed inside master page like it was explained in Master-Detail article. With navigation mechanism like that, we can easily navigate to another from view model (which should holds that kind of logic anyway) to another page using its view model, completely oblivious to detail of view implementation.
Navigation to view model type by resolving that type from IoC container, allows to inject this model dependencies in very easy and elegant way via constructor. You need show to the user GPS location? You just need to add new constructor parameter with IGSPService and use obtained reference.
How to do it? First we need to create Xamarin application with shared project – IoCSample. In this article I will use Android platform. Rest of platform projects are not necessary. After creating projects we need to add few references to Android project: ViewFactory, ViewFactory.Android and CustomMasterDetailControl (all are available in XamarinSamples, where this article code will be added also). Those projects are neccessary to implement better navigation between views. CustomMasterDetailControl assembly contains MasterDetailControl, which will allow us to create detail views and put them inside defined master control. Detail views along with ordinary Xamarin views will allow to show how navigation is independent from views definitions. ViewFactory projects will be used internally by navigation for views creation. After that we can add TinyIoC file with IoC container definition. This class do not need any initialization. Use of static value TinyIoCContainer.Current is enough for our needs.
Now we can change default application. Here is content of App.xaml. App.xaml.cs and MainActivity.cs files, if we do things without IoC.
<?xml version="1.0" encoding="utf-8" ?>
<Application

             x_Class="IoCSample.App">
</Application>
public partial class App
{
    public App ()
    {
        InitializeComponent();
        MainPage = new MainPageView { BindingContext = new MainPageViewModel() };
    }
}
[Activity(Label = "IoCSample", Icon = "@drawable/icon", MainLauncher = true, ConfigurationChanges = ConfigChanges.ScreenSize | ConfigChanges.Orientation)]
public class MainActivity : global::Xamarin.Forms.Platform.Android.FormsApplicationActivity
{
    protected override void OnCreate(Bundle bundle)
    {
        base.OnCreate(bundle);

        global::Xamarin.Forms.Forms.Init(this, bundle);
        LoadApplication(new IoCSample.App());
    }
}
We are creating two instances: view and view model to create main page for application. Goal is to use ViewFactory to create page from view model type. To do that we need to first register ViewFactory service in IoC, but because ViewFactory is defined in Android platform project (because few Reflection features are not that easily accessible from PCL and it is much easier from full .NET in platform project; however this is possible in PCL but exceeds scope of this article), we also need to register this service in platform class – MainActivity.
protected override void OnCreate(Bundle bundle)
{
    base.OnCreate(bundle);
    RegisterServices(TinyIoCContainer.Current);
    global::Xamarin.Forms.Forms.Init(this, bundle);
    LoadApplication(new IoCSample.App());
}

private void RegisterServices(TinyIoCContainer container)
{
    container.Register<IViewFactory, VFactory>();
}
IViewFactory is new interface for ViewFactory class, which will make use of it more convenient with IoC.
public interface IViewFactory
{
    UIPage CreateView<TViewModel>() where TViewModel : BaseViewModel;

    UIPage CreateView<TViewModel, TView>() where TViewModel : BaseViewModel
        where TView : UIPage;

    UIPage CreateView<TViewModel, TView>(TViewModel viewModel) where TViewModel : BaseViewModel
        where TView : UIPage;

    UIPage CreateView(Type viewModelType);
    void Init(Assembly appAssembly);
}
Then we can initialize MainPage of application, with ViewFactory.
public IViewFactory viewFactory { get; set; }

public App()
{
    var container = TinyIoCContainer.Current;
    container.BuildUp(this);
    viewFactory.Init(Assembly.GetExecutingAssembly());
    InitializeComponent();
    MainPage = viewFactory.CreateView<MainPageViewModel>();
}
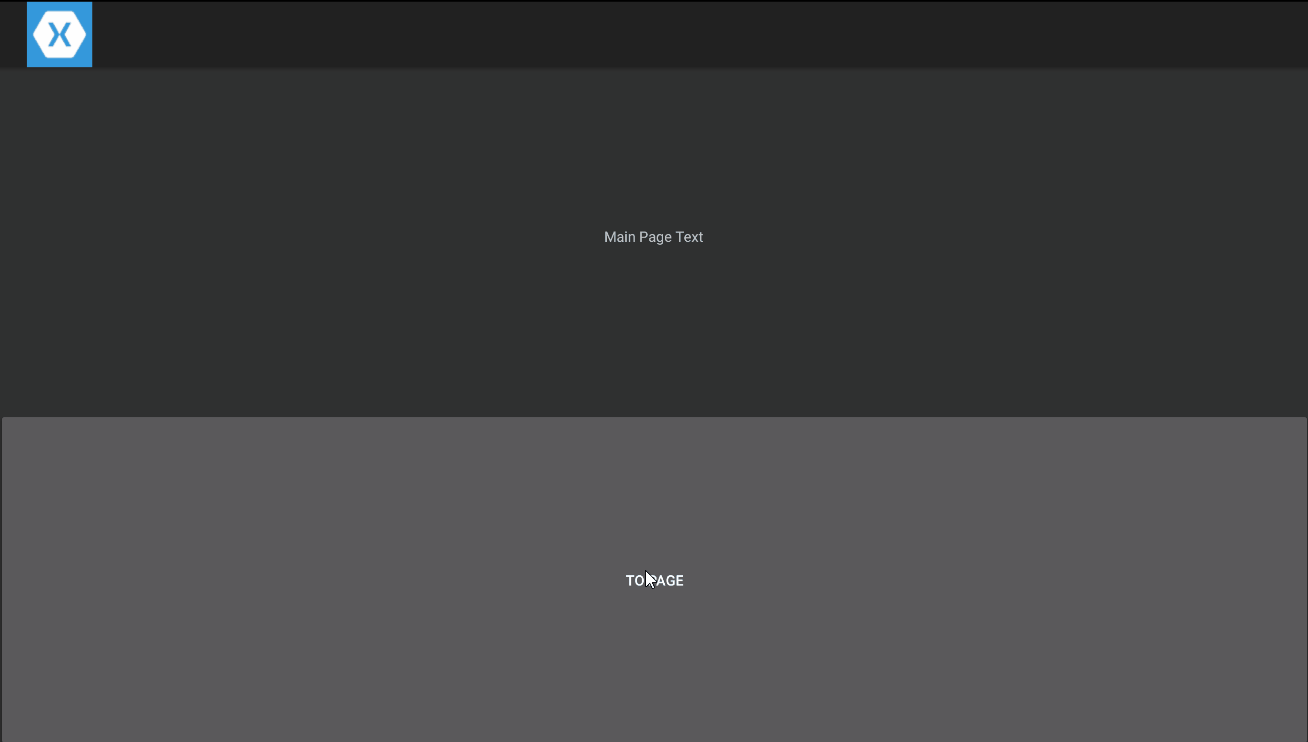
After starting application we will see MainPage, which proves that ViewFactory, IoC combo work.
Ok, but still it is just creation of new value for MainPage property of application. How to implement easier navigation? If you are not planning single page application, we need Xamarin INavigation instance. Easiest way to obtain one is to create NavigationPage instance as value for MainPage instead.
MainPage = new NavigationPage(viewFactory.CreateView<MainPageViewModel>());
Now let’s create another page to be able to test if new navigation works.
<?xml version="1.0" encoding="UTF-8"?>
<customMasterDetailControl:UIPage


                                  x_Class="IoCSample.PageView">
  <Label Text="{Binding Label}" HorizontalOptions="Center" VerticalOptions="Center"/>
</customMasterDetailControl:UIPage>
Next step is to create navigation between view models. We can create static class NavigationHelper for this.
public class NavigationHelper
{
    private static readonly INavigation _navigation;
    private static readonly IViewFactory _viewFactory;
    private static TinyIoCContainer _container;

    static NavigationHelper()
    {
        var container = TinyIoCContainer.Current;
        _container = container;
        _viewFactory = container.Resolve<IViewFactory>();
        _navigation = container.Resolve<INavigation>();
    }

    public static void NavigateTo<TViewModel>() where TViewModel : BaseViewModel
    {
        _navigation.PushAsync(_viewFactory.CreateView<TViewModel>());
    }

    public static void NavigateTo<TViewModel>(Action<TViewModel> init) where TViewModel : BaseViewModel
    {
        var viewModel = _container.Resolve<TViewModel>();
        init(viewModel);
        _navigation.PushAsync(_viewFactory.CreateView(viewModel));
    }
}
It uses new CreateView method inside ViewFactory class.
public UIPage CreateView<TViewModel>(TViewModel viewModel)
{
    var viewModelType = viewModel.GetType();
    if (Views.ContainsKey(viewModelType))
    {
        var viewData = Views[viewModelType];
        return CreateView(viewModel, viewData.Creator);
    }
    return null;
}
Above method allows us to create page with given view model. But it would made things problematic if view model need to be initialized somehow before navigation to its page. For example product details new instance or identificator of a product. We can create new button inside MainPage which will cause navigation to new PageView with initialization action to show how this works.
New view model looks like below.
public class PageViewModel : BaseViewModel
{
    public void SetLabelText(string value)
    {
        Label = value;
    }

    public string Label { get; set; }
}
Initialization method and property that is binded to view label. Navigation to this page is implemented with new NavigationHelper class called from MainPageView button.
<Grid>
    <Grid.RowDefinitions>
        <RowDefinition></RowDefinition>
        <RowDefinition></RowDefinition>
    </Grid.RowDefinitions>
    <Label Grid.Row="0" Text="{Binding MainText}" VerticalOptions="Center" HorizontalOptions="Center" />
    <Button Grid.Row="1" Text="To Page" Command="{Binding ToPage}" />
</Grid>
public ICommand ToPage
{
    get
    {
        return _toPage ?? (_toPage = new Command(() =>
                {
                    NavigationHelper.NavigateTo<PageViewModel>(
                        vm => vm.SetLabelText("Value from MainPageViewModel"));
                }));
    }
}
After build and run, application correctly navigates from MainPageView to PageView.
The same command but without initialization of view model is less complicated and looks like this.
public ICommand ToPage
{
    get
    {
        return _toPage ?? (_toPage = new Command(NavigationHelper.NavigateTo<PageViewModel>));
    }
}
There is also possibility of creating i.e. IViewModelInit interface with Init() method, but it creates another problem. How to define parameters in this method? If this will be single object type value, it forces cast to correct type to set necessary data in view model. If we do not want casting we need to create generic BaseViewModel<> class with generic method for initialization. But still it forces us to put types in two places (type definition and initialization method), which complicates code that usually changes very often and still exists problem with number of parameters (though I never saw such method with more than two parameters). This is why i decided to leave it like this.
Nevertheless, we can simplify this further by creating method for navigating inside base view model class. Ideally it would be to put inside BaseViewModel but it is referenced assembly without knowledge of NavigationHelper class. Because of that we need to create new NavigationViewModel type with those method and then change application view models base types.
public class NavigationBaseViewModel : BaseViewModel
{
    public static void NavigateTo<TViewModel>() where TViewModel : BaseViewModel
    {
        NavigationHelper.NavigateTo<TViewModel>();
    }

    public static void NavigateTo<TViewModel>(Action<TViewModel> init) where TViewModel : BaseViewModel
    {
        NavigationHelper.NavigateTo(init);
    }
}
After changing MainPageViewModel base class to type above we can rewrite ToPage command once again.
public ICommand ToPage
{
    get
    {
        return _toPage ?? (_toPage = new Command(() =>
        {
            NavigateTo<PageViewModel>(vm => vm.SetLabelText("Value from MainPageViewModel"));
        }));
    }
}
In one line we can now order our application to:
- Create view model instance
- Initialize view model instance with appropriate data from previous view
- Create new view
- Set view model in new view
- Show new view to the user
Pretty elegant solution comparing to what is required in Xamarin by default.
public ICommand ToPageXamarin
{
    get
    {
        return _toPage ?? (_toPage = new Command(() =>
        {
            var newView = new PageView();
            var newViewModel = new PageViewModel();
            newViewModel.SetLabelText("Value from MainPageViewModel");
            newView.BindingContext = newViewModel;
            var navigation = App.Current.MainPage.Navigation;
            navigation.PushAsync(newView);
        }));
    }
}
Above code gets even more comlicated if PageViewModel would have some dependecies with dependecies etc.
How about navigation to Detail pages?
Next step is to implement navigation to detail pages too in the same way – by single call to NavigateTo<> method. This requires us to change NavigationHelper class. Problem with static class is that we can’t enforce in any way necessity of pointing out which Master page should be used. Of course you can have one single file for all of yours application, but I highly doubt it. In Most of the time, they will differ a little. Because of that, even class MasterPageControl as in previous article might not be enough since it i.e. lacks ability to put menu on the left side of application (but can be easily achieved by modification of MasterPageControl.xaml file). Of course it is possible to create static property, let’s say called MasterPageViewModelType, which would point out, which master view should be used for detail pages, but this is more error prone. I prefer to make code as clear to use as possible and then throw errors in run-time. Most of the time I am end user of my own code and I do not want to think how I should implement some mechanism to ‘get things done’ 🙂 It should be easy and obvious as much as possible. Because of that better idea is to do service for navigation as abstract base class, with abstract property, with type of master page view model.
So we need base implementation of NavigationService. Good idea is to create generic class.
public class NavigationService<TMasterViewModel> : INavigationService<TMasterViewModel>
        where TMasterViewModel : MasterDetailControlViewModel
{
}
Most of the code is copied from NavigationHelper, but to implement detail views support we need add few new things.
public TMasterViewModel MasterViewModel
{
    get
    {
        var page = _navigation.NavigationStack.LastOrDefault();
        return page?.BindingContext as TMasterViewModel;
    }
}
Above property returns instance of master view model as type defined in class definition. Instance is not null only if there is already master page on top of a stack. Why? Because Xamarin INavigation do not allow the same page to be twice in the views stack (which makes sense) and this is why we need to create new master page every time detail page is added after ordinary, fullscreen page. Think of this as:
Master(Detail1) -> Full screen page -> Master(Detail2)
If you want to push new detail page on stack like above you can reuse last master page. But if you want to push new detail page on top, after ‘full screen page’ is on top, you cannot reuse previous one because it is already in other position. Therefore new instance has to be created.
With this knowledge we can implement new NavigateTo<> methods.
public void NavigateTo<TViewModel>() where TViewModel : BaseViewModel
{
    PushPage<TViewModel>(_viewFactory.CreateView<TViewModel>());
}

public void NavigateTo<TViewModel>(Action<TViewModel> init) where TViewModel : BaseViewModel
{
    var viewModel = _container.Resolve<TViewModel>();
    init(viewModel);
    PushPage<TViewModel>(_viewFactory.CreateView(viewModel));
}

public void PushPage<TViewModel>(Page page) where TViewModel : BaseViewModel
{
    if (!_viewFactory.IsDetailView<TViewModel>())
    {
        _navigation.PushAsync(page);
    }
    else
    {
        var masterViewModel = MasterViewModel;
        UIPage masterPage = null;
        if (masterViewModel == null)
        {
            masterPage = _viewFactory.CreateView<TMasterViewModel>();
            masterViewModel = (TMasterViewModel)masterPage.BindingContext;
        }
        masterViewModel.Detail = page;
        if (MasterViewModel == null)
        {
            _navigation.PushAsync(masterPage);
        }
    }
}
New PushPage method takes care of previous call to INavigation.PushAsync for ordinary (full screen) pages.
It uses new IsDetailView method of IViewFactory interface to found if page is detail view.
public bool IsDetailView(Type viewModelType)
{
    return Views[viewModelType].IsDetail;
}

public bool IsDetailView<TViewModel>() where TViewModel : BaseViewModel
{
    return IsDetailView(typeof(TViewModel));
}
ViewFactory already contains information if view is detail view or not. We just needed new method to extract this information from service.
If above method returns true for some view model it means that it has to be handled differently and cannot be directly pushed into INavigation stack. This different logic is handled by else clause in INavigationService.PushPage method. If there is no master page on top – it is created (as there was explained above) along with appropriate view by ViewFactory. After that new detail page is set in master and finally master page is pushed into navigation stack of Xamarin (if is not there yet). That explained, here is whole class will look like.
public class NavigationService<TMasterViewModel> : INavigationService<TMasterViewModel>
    where TMasterViewModel : MasterDetailControlViewModel
{
    private readonly TinyIoCContainer _container;

    private readonly INavigation _navigation;

    private readonly ViewSwitcher.IViewFactory _viewFactory;

    public NavigationService()
    {
        var container = TinyIoCContainer.Current;
        _container = container;
        _viewFactory = container.Resolve<ViewSwitcher.IViewFactory>();
        _navigation = container.Resolve<INavigation>();
    }

    public TMasterViewModel MasterViewModel
    {
        get
        {
            var firstOrDefault = _navigation.NavigationStack.FirstOrDefault();
            return firstOrDefault?.BindingContext as TMasterViewModel;
        }
    }

    public void NavigateTo<TViewModel>() where TViewModel : BaseViewModel
    {
        PushPage<TViewModel>(_viewFactory.CreateView<TViewModel>());
    }

    public void NavigateTo<TViewModel>(Action<TViewModel> init) where TViewModel : BaseViewModel
    {
        var viewModel = _container.Resolve<TViewModel>();
        init(viewModel);
        PushPage<TViewModel>(_viewFactory.CreateView(viewModel));
    }

    public void PushPage<TViewModel>(Page page) where TViewModel : BaseViewModel
    {
        if (!_viewFactory.IsDetailView<TViewModel>())
        {
            _navigation.PushAsync(page);
        }
        else
        {
            var masterViewModel = MasterViewModel;
            UIPage masterPage = null;
            if (masterViewModel == null)
            {
                masterPage = _viewFactory.CreateView<TMasterViewModel>();
                masterViewModel = (TMasterViewModel)masterPage.BindingContext;
            }
            masterViewModel.Detail = page;
            if (MasterViewModel == null)
            {
                _navigation.PushAsync(masterPage);
            }
        }
    }
}
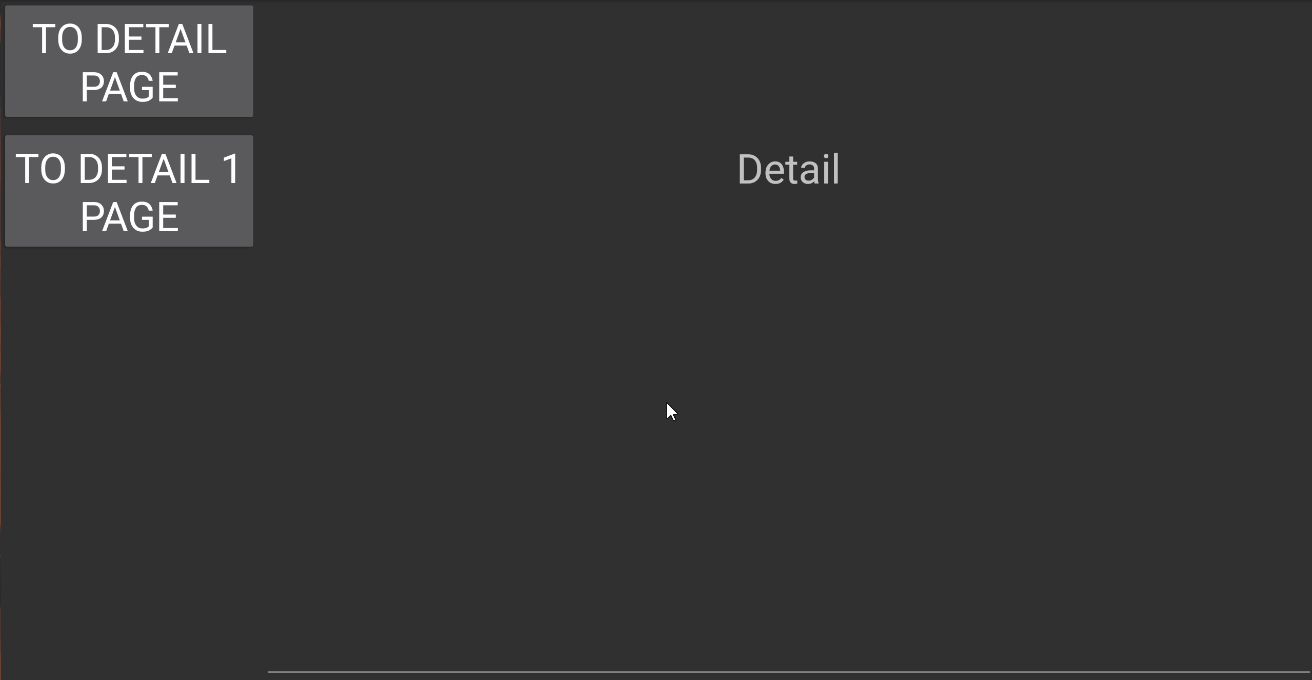
Now we can finally put it to use. For example new button added to PageView in similar way like in MainPageView, will navigate to new DetailView.
<Grid>
    <Grid.RowDefinitions>
        <RowDefinition />
        <RowDefinition />
    </Grid.RowDefinitions>
    <Label Grid.Row="0" Text="{Binding Label}" HorizontalOptions="Center"
            VerticalOptions="Center"/>
    <Button Grid.Row="1" Text="To detail"  Command="{Binding ToDetailPage}" />
</Grid>
With view model like below.
public class PageViewModel : NavigationBaseViewModel
{
    private Command _toDetailPage;

    public void SetLabelText(string value)
    {
        Label = value;
    }

    public string Label { get; set; }

    public ICommand ToDetailPage
    {
        get
        {
            return _toDetailPage ?? (_toDetailPage = new Command(OnToDetailPage));
        }
    }

    private void OnToDetailPage()
    {
        NavigateTo<DetailViewModel>();
    }
}
But we need to define master page first – MasterDetailControl.
<masterDetail:MasterDetailControl


    x_Class="IoCSample.Views.MasterDetailView">
    <masterDetail:MasterDetailControl.SideContent>
        <StackLayout>
            <Button Text="To detail page" Command="{Binding ToDetail}" />
        </StackLayout>
    </masterDetail:MasterDetailControl.SideContent>
</masterDetail:MasterDetailControl>
View model for above view looks like this.
public class MasterDetailViewModel : MasterDetailControlViewModel
{
    private ICommand _toDetai;

    public ICommand ToDetail
    {
        get { return _toDetai ?? (_toDetai = new Command(OnToDetail)); }
    }

    private void OnToDetail()
    {
        NavigationHelper.NavigateTo<Detail1ViewModel>();
    }
}
Now we need just to register new service in container, in App.xaml.cs file and we can try it out.
public void RegisterServices(TinyIoCContainer container)
{
    container.Register<INavigationService, NavigationService<MasterDetailViewModel>>();
}
After running this code we can see that, this works fine and should give result similar to image below.

Now, when we have Navigation implemented, we can jump to second topic.
ViewModels dependency injection.
Views are supposed to have no constructor dependencies. Models are usually just data or data containers, which data logic (add order for customer etc.). The only thing UI should have is application logic in view models. Most of the time they will obtain new data or show existing data to the user. But sometimes there is a need for some specific logic i.e. get GPS location, connect with Bluetooth device, generate pdf, show modal dialog etc. All those functions are more general and it is good idea to implement them as services that can be shared between different views and applications. Sharing can be implement by IoC container and Dependency Injection (via constructors) in view models.
What we need to do in our project to achieve that? Two things:
- ViewFactory should create view models from IoC container not Activator class.
- Register services during application initialization.
With those two we can add parameters to constructors with services interfaces.
Let’s do first point first. It is quite easy and the only problem is that we have to create virtual method in BaseViewFactory class and overwrite it in new type defined in the same assembly as TinyIoC.
private UIPage CreateView(Type viewModelType, Func<UIPage> creator)
{
    var viewModel = CreateViewModelInstance(viewModelType);
    return CreateView(viewModel, creator);
}

protected virtual object CreateViewModelInstance(Type viewModelType)
{
    var viewModel = Activator.CreateInstance(viewModelType);
    return viewModel;
}
Above methods are part of changed BaseViewFactory. Logic is the same – create instance of type via Activator. Now, new type in IoCSample project.
public class IoCViewFactory : ViewFactory.ViewFactory.ViewFactory
{
    private readonly TinyIoCContainer _container;

    public IoCViewFactory(TinyIoCContainer container)
    {
        _container = container;
    }

    protected override object CreateViewModelInstance(Type viewModelType)
    {
        return _container.Resolve(viewModelType);
    }
}
As you can see we just had to overwrite virtual method to use IoC container instead of Activator class. This is all we had to do! 🙂
Now we need to create and register some service to use it inside view models. Let’s imagine that we have some mechanism to store cache data in database or in file. We can change and/or read it from any view model. For case of simplicity following class, interface is enough for our sample.
public class DataCacheService : IDataCacheService
{
    public Dictionary<string, object> DataCache { get; } = new Dictionary<string, object>();
}
public interface IDataCacheService
{
    Dictionary<string, object> DataCache { get; }
}
Really simple mechanism to save some information during runtime. We have to register this service in container. We can do this inside App.xaml.cs file.
public void RegisterServices(TinyIoCContainer container)
{
    container.Register<INavigationService, NavigationService<MasterDetailViewModel>>();
    container.Register<IDataCacheService, DataCacheService>().AsSingleton();
}
We can now share cached data by accessing service. For example we can save data in one view model – DetailViewModel and read it in another one – Detail1ViewModel. Saving is done by simple Entry control binded to view model property. Every time user change value of Entry, data is saved. Then after navigation to another view it will show saved data in its label. Below is code of mentioned view models.
public class DetailViewModel : BaseViewModel
{
    private readonly IDataCacheService _dataCacheService;
    private string _text;

    public DetailViewModel(IDataCacheService dataCacheService)
    {
        _dataCacheService = dataCacheService;
        if (_dataCacheService.DataCache.ContainsKey(CacheKey))
        {
            _text = (string)_dataCacheService.DataCache[CacheKey];
        }
    }

    public const string CacheKey = "CacheKey";

    public string Text
    {
        get { return _text; }
        set
        {
            _text = value;
            _dataCacheService.DataCache[CacheKey] = value;
        }
    }
}
public class Detail1ViewModel : BaseViewModel
{
    public Detail1ViewModel(IDataCacheService dataCacheService)
    {
        if (dataCacheService.DataCache.ContainsKey(DetailViewModel.CacheKey))
        {
            Text = (string)dataCacheService.DataCache[DetailViewModel.CacheKey];
        }
    }

    public string Text { get; private set; }
}
Really simple example. Appropriate views for view models are even simpler and there is no point listings their code.
After running new application we can test if this actually works.
As you can see value entered in one view is accessible in second one. Dependency injection in view models works fine with automatic navigation to views by view model types, without consideration of specifics of view definition. 🙂
Cleaned and refactored code (everything in one project) you can download from here: IoCFinal.zip (77.98 kb) or from github (with other Xamarin articles in the series).